Wednesday, April 24, 2013

The Great Motorhome Hunt


The Good, The Bad & The Ugly
We recently purchased a 1998 Jayco Eagle 26' Motor Home via an ad found on Craigslist.  It had less than 13k original miles, a generator that fired right up with less than 100 hours on it and every single appliance worked properly.  All of this for right around $10K.  Say whaaaat?  It sounded great.  It even looked OK.  It smelled pretty awful and in the words of my 7 year-old nephew, I have a nose like a dog.  He recently said that to me.  Really.  I am usually spot-on re smells.  However, my husband pretty much dismissed my issue (because he could not smell anything weird at all) with the "scent" and kept it moving.  Mistake #1.

In all fairness, I should mention that a few years back we had a water leak in our bathroom (shower pan failure) and I coincidentally started getting sick more than usual - anyway, I SWORE there had to be mold.  Like complained so much that we systematically ripped out our entire bathroom.  Down to the studs.  There was not any mold.

Ooopsie.

Hey, I never said I smelled anything, only that there had to be hidden mold spores somewhere that were probably killing me every time I inhaled.  I am not dramatic.  At all.

Moving on...

The Idea
My husband has wanted a recreational vehicle on and off for the past 7 years.  We go back and forth regarding the idea.  He likes to tent camp, I don't.  My idea of camping is at the Marriott or any Hilton Family Establishment.  We have looked at least 3 times for a few days each time and have never come to an agreement on what to purchase.  We have looked at trailers, pop-ups, hybrids and motor homes.  New, semi-used and way used (like as in before I was born).  For me, it always comes down to the money factor.  I refuse to spend money on something I am not even sure we will use enough to justify the cost.  I may buy $40 flip flops, but mama rocks those on the daily.  Just saying.  Anyway, about a month ago (end of March '13), I heard him mention the motor home idea again and I said, "I'm not opposed to looking at a motor home if the total monthly cost including insurance does not exceed $350."

The hunt began.  We both started scouring the Internet for recreational vehicles.  We drove to more than a few RV places.  We looked at a couple of private-party RVs.  We almost purchased a brand spanking new Hybrid Travel Trailer.  When I say almost, what I mean is I went online to our credit union and got pre-approved for the full amount plus tax and license.  To the tune of $27k.  For real.  We had a plan, man.  We were so excited, we started researching camp grounds and how people set up said campgrounds.  Like what types of awesome things people buy to make their camp area uber-cool.  We stumbled upon a picture of our same Travel Trailer (TT) and realized all at once, the TT lifestyle wasn't going to work for us.  The picture had a camp fire in it.  Like really close to the TT.  I know, you are thinking, so what?  That's what you do when you camp.  Uhm yeah.  People do build camp fires, hang out till the wee hours, sing songs, tell jokes and stuff.  Not this mama.  I am highly allergic to smoke.  If I am anywhere near smoke, I will get sick.  Like lung infection, respiratory distress, (TMI) green phlegm kind of sick.  So is my kid.  Like as in all kinds of smoke.  The whole point of a Hybrid TT is it has tent-like ends that fold down on each end or sides of the unit.  These ends are made of tent-like material.  HELLO.  I am not risking that much money on the hope that I won't smell the smoke inside the unit.  I mean, come on.  Every time my husband comes back from camping, we have to completely sanitize all of the stuff he used during his trip.  The camp fire smoke infects everything.  So, all at once our dreams of Hybrid camping went poof.  At that point, we decided to put the entire RV thing on the back burner for awhile.

Except, the next day I needed to get my mind of making the remembrance cards for my dads funeral.  So what did I do?  I went back on Craigslist and started looking at used Class C Motor Homes.  Okay, so this is the point where I admit, this entire thing is kind of my fault.  If I would have stuck to the plan of waiting awhile, we more than likely would not be in this mess.  Super long story shortened:  I stumbled across the one we ended up purchasing.
1998 Jayco EAGLE Series M-267 F-FORD WB
 We knew by purchasing any used RV there would be some things we would have to "renovate" or "re-do".  "Re-do" is probably not the right term in this case.  More like "should have never even considered purchasing", but coulda, woulda shoulda... Mistake #2.

We were told this specific RV had some past water damage.  Most used RVs do.  The water damage occurred on the roof near the overhead bunk.  The previous owner had repaired the entry point and everything was "just fine now".  Yeah.  Understatement of the YEAR, people!  Mistake #3 (This entire "listing of the mistakes" is actually no longer any fun for me.  It actually is making me nauseous at the moment.  Suffice to say, I am going to stop with the bloggy-land sarcasm).

DISCLAIMER re My Mental State:
Let me sum this up in a quick paragraph or less - My dad had just died and I was in the middle of preparing for his service during our "Great Motor Home Hunt".  Needless to say, but fair to mention in case someone just isn't following here:  I was an emotional wreck.  I would have more than likely agreed to anything just to keep my mind of of what I was going through at the time.  What's the saying, "Hindsight is 20/20"??  Well, I am pretty sure I would not be interested in this same motor home had I been my normal, super rational (for the most part) self.

The Pictures
Because lets face it: pictures will tell you way more than I ever could.  The first three pictures are the ones I originally saw on Craigslist.  When we went to see the RV in person, it looked pretty much the same inside.


Kitchen looking toward the back
Looking toward the front
Bathroom
When we initially saw the RV, we knew the roof would need some general maintenance repairs.  This picture was taken a couple of days after we brought the RV home.
Roof
We figured all we needed to do inside was rip out the old flooring, reupholster the dinette and thoroughly clean and disinfect the unit.  Boy, were we wrong on so many levels.
Removing carpet and linoleum

Remember that smell I mentioned noticing the first day we looked at the RV?  Well, after Sal had ripped out all of the old flooring, it was still there.  I insisted we investigate further.  I started opening cupboards and closets and smelling everything.  I kept coming back to the same area near the dinette and that was where it was really bad.  I demanded asked him nicely to remove a small piece of the wallpaper so we could see what was behind it.  Based on his previous experience with me (hello 10k bathroom remodel), he decided to remove a piece of the wallpaper from inside of the cupboard.  At this point, he was super annoyed with me.  All he wanted to do was go down to Lowe's and pick out some flooring.  He even said something like, "If I remove a piece of this wallpaper and nothing is there, I am going to be upset".  Something like that.  I think there were a few choice words I refuse to type on a family-friendly blog.  Just saying.

At the time, I did not think to snap a picture of the initial cut and there was no way I was going anywhere near the inside after he made that first cut.  By the way he was talking out loud to himself, I knew it wasn't good news.  That "small" piece turned into the complete removal of the cupboards over the dinette are.  This is what was waiting for us:

Major wood rot caused by water damage
and that was only the beginning people...

The Water Damage
Is way worse than anyone ever thought.  The walls on 1/3 of the drivers side are completely rotten and the foam behind them has what looks like black mold.  BLACK!  The overhead bunk has to be completely rebuilt.  The only thing holding up the fiberglass siding are a few screws my husband has yet to remove.  My husband has already ripped out the flooring, removed all of the equipment from the roof, gutted the rotted wood walls and scraped most of the foam from the inside, removed almost the entire overhead bunk and some of the roof.  Here are some additional pictures:

Most of the rubber removed from the roof
Another shot - The dark part toward the front is wet wood
Where the cabinets used to be
Another shot of the same area
Below the cabinets, where the dinette used to be
Since there was so much damage and really no acceptable way to repair the rotten wood, and after much research, we decided to cut out all of the bad areas.  This includes the entire front bunk.  (I did not get a picture of this, but the guys told me when they started removing the drivers side front bunk area, water started pouring out!)

Our friend Ray and Sal removing the damaged front bunk area
Notice all of the black areas on the wall.  All of the wood in this area has been removed.  That is the foam that was behind the actual rotted wood.  Oh, and the black stuff - that is MOLD.
Another shot
Looking toward the front
Most of the damaged area has been removed
The Interior
The front of the cab is near perfect.  The seats show minimal wear, the wood grain looks great and the carpet doesn't have a stain on it.  This is the only area we are not ripping out.

Only someone above knows what has been used on the cushions throughout the rest of the motor home.  They smell like a mixture of old-lady perfume and funk.  We went to an upholstery shop today and they estimated $1,500 to replace all of the cushions in the dinette, the overhead bunk bed and recover everything including the valances.  The price also includes recovering one chair.  I know think we can do it ourselves for less.  After researching the best way to approach this and realizing how expensive foam is (!!) I am down to try anything to get the cushions clean and smelling freshly laundered before shelling out hundreds of dollars on foam.  I am going to attempt to clean one of them by placing it in the bathtub with oxi-clean and detergent and pounding on them until the water rinses clean (settle down, I plan on using gloves)...then air drying outdoors for a few days.  I will also try a baking soda method I read about and then go from there.  I figure it will save me hundreds of dollars if it works.  If it doesn't, then I only wasted a few hours.  At least I will know I exhausted all possible ways to save us some money.

So to recap, we need:
  • A completely new roof
  • New interior walls
  • Repair or replace the fiberglass on the drivers side and the overhead bunk
  • New cushions and upholstery
  • Paint the entire interior including cabinets and walls
  • Replace the toilet and bathroom sink (they work, but are really discolored due to age.  The shower, on the other hand, is fine).
  • Brand new flooring throughout (the sub-floors look perfect.  No water damage or anything).
  • New hardware (handles and hinges) throughout
  • Attempt to clean the day/night shades
  • and probably a ton of things we don't even realize yet
The good news is the RV runs like a champ.  It passed smog, is fully insured and Sal had new tires put on it.  This was before we realized how much work was yet to be done.

I always say there is a reason for everything and I truly believe that.  Throughout this experience, I have learned way more than one ever needs to know re motor homes.  I can easily explain how to tear off and rebuild a roof (the rubber EPDM kind) on an RV; what to look for when browsing used RVs and most importantly what to run away from.  I have researched everything from how to clean the old, nasty, rank-smelling foam cushions, and  re-cover them, to the cheapest place I have found to purchase new custom foam replacement cushions from.  I have researched the best way to clean the stained day/night shades and maintain the pleats while drying.  I have read, browsed and commented on many a blog and forum post throughout the world wide web (does anyone even call the Internet that anymore?) as well as "pinned" a ton of stuff to my Pinterest account.

Will any of this actually work??  How the heck do I know?!  We are just getting started...
What I can say is this:  Remember that bathroom of ours?  Before my accusation re the mold, it was the original 1950's mint green bathroom.  We now have a travertine-tiled, spa-like bathroom complete with a eucalyptus steam shower.  That has got to count for something.

Anyone?  Anyone??

Ray said the RV is now the "Ultimate Beach Cruiser".  He has jokes.

Saturday, April 20, 2013

Backyard Botanical Complete Gardening System Detailed Review

Okay, so I know it has been some time since I have posted anything to my blog.  I don't really have any excuses, except that I have been extremely busy (see: overwhelmed with life).  However, in my opinion, the wait has been worth it.  I am so excited to tell you about this:

Backyard Botanical Complete Gardening System
Pretty, right?  RIGHT?!!  It wasn't easy, but if the set-up was the hardest part, I am more than happy to be past it.

Please note I am a details type of girl, so this post is super detailed.  Maybe next time I should break something this big up into smaller posts?  I'm not sure....okay so here goes...all you ever wanted to know about the....wait for it....drum roll, please:

Backyard Botanical Complete Gardening System by Leisure Time

photo via Sam's Club

SPECIFICATIONS
(via Sam's Club Website)


  • 20" High raised beds
  • Natural decay resistant cedar
  • Automatic irrigation system
  • Pest-proof flooring & fencing
  • Innovative polyethylene planting tubs
  • Coil Garden hose with sprayer
  • Built-in trellis for climbing plants
  • Holds 1.5 cubic yards of soil
  • Detailed assembly manual
  • Ships in two boxes


  • MY REASONS (aka justifications)
    I have been coveting this garden since 2009 (!!) and could never bring myself to spend the money.  It is pricey, but after getting it all together, even my husband agrees it is well made and well worth the cost.  Even though we live on a little over 2.5 acres, it is extremely hard to grow anything.  We have rabbits, squirrels, gophers, owls and even the occasional coyote.  Our dog, Gracie brings us "treats" often.  Ew.  Those pests demolish everything from flowers to grass to our friend Ray's electrical wiring in his car!  Twice.  Anyway, I knew I for sure did not want to put a ton of time and effort into planting a garden only to have the animals ruin everything.

    That was my Reason #1 for buying this system.
    Reason #2:  I do not want to deal with weeds.  Sorry, but this mama is not interested.
    Reason #3:  Raised gardening is easier on your knees and your back.  Isn't it?
    Reason #4:  I just liked it, okay?

    THE COST
    I originally saw it at my local Sam's Club toward the end of Summer in 2009 for a little less than $400.00.  Sam's club always brings back their seasonal Summer items each year, right?  NOT.  My bad for not buying it then.  Since that time, I have watched and waited for it every Spring & Summer.  Just hoping.  I knew they had it online, but heck if I was going to pay shipping on this sucka.  When I purchased mine (March 22nd, 2013), this website was selling this same system for quite a bit more than what I paid: $1099.  It is now listed for $599.00 (including shipping).  Home Depot and Sears both carry it for $799.  I bought mine from Sam's Club for $575 (including shipping).  Tax was not included, so my total with shipping and tax came to $621.  Fair to say, it did take about a week longer than the estimated time of arrival I was given.

    THE PREP
    Before we could even think of setting something this big up, I knew we had to figure out where we were going to place it.  The instructions say, "For best gardening results select a level area that will receive at least 6 hours of sunshine per day."  I chose somewhere close to my house, because let's face it, I am not about to be gardening all the way down at the other end of our property.  Period.  Also, I needed a sunny location and access to water.  I was already asking a lot of my husband without adding, "Please run a water line for me, too."

    I mentioned where I thought I wanted it and before I could even consider other places, he was already out there prepping the ground!  Hmmm, note to self: decide if I really want the driveway re-paved and an electrical gate with call box.  I digress.

    First, he measured the space we would need for the actual garden (8x8) and then an extra foot in order to leave room for pavers or ground cover.  Next, he spray painted lines to use as guides.  Then, he fired up our rototiller and got to work.  All in all, it took less than an hour to prep the ground from start to finish.  It was super soft when he was done.  Like so soft, that my Havaianas literally sunk into the ground.  Anywho, here are some before, during and after pics:

    Spray painted lines to use as guides.
    Another view of area to be tilled.
    I had no idea we actually owned one of these.
    My husband, Sal, hard at work.
    First turn.
    You get the picture, eh?
    Finished with the hard part.
    Ground tilled and smoothed with the flat side of a rake.
    Random bird.  Thank goodness Gracie was asleep.
    THE ASSEMBLY
    Once my Backyard Botanical Complete Gardening System finally arrived, we immediately put it together it sat for two days.  I wasn't about to touch that thing on my own,  I don't even have a working drill gun at the moment and my furniture putting-together-skills are limited to IKEA furniture.  No joke.  Besides, it looked like it might rain and I for one was not about to start a project only to get rained on.

    We asked our friend, Lucas to help assemble the garden put the garden together by himself.  He arrived around 8:30 AM with all of the required tools and was here until about 8:00 PM.  Settle Down, I fed him.  Geez.  Also, my husband, another friend and our son helped toward the end.  Oh, and I supervised.  (Pretty much walked around pointing out things while trying not to ruin my pedicure.)  Just saying.

    I would like to mention, Lucas said the biggest problem with the assembly was that the "tools required" section did not list all of the tools required (!!).  Thank goodness he is a man of many tools and happened to have all of the extra drill bits and other paraphernalia required to complete the job.  Also, be advised: not a single hole was pre-drilled or marked.  It was a lot of work.  I highly recommend hiring a skilled person to assemble this thing.  Had I begun on my own, I would have been upset, to say the least.

    Lucas, reading the directions before starting.
    Organizing the materials and still reading.  A boy who actually reads!
    Base put together.
    Adding the plastic liner.
    We happened to have a ton of bricks laying around, so we used those to create a foundation of sorts under the edges of the garden.  Mainly to help level the area.  Also, (I forgot to take a picture of this step) prior to installing the black plastic material included in the kit, we added extra mesh wire below the plastic to ensure pesky critters would be less likely to eat through the plastic.  The guys used a utility knife to cut it to fit and a staple gun to attach it to the cedar frame.
    My 8-year-old son wanted to help, too.
    Assembling the back.
    A drill gun is a must for this project.
    After the garden was fully assembled, we sprayed two coats of Thompson's WaterSeal and then used a paint brush to make sure it was evenly applied and in all of the crevices.  Dry time was approx 30 minutes between coats.
    Dry brushing Thompson's WaterSeal
    Lucas, done for the day.
    It was around 8 PM at this point - I wanted to quit for the day, my husband - not so much.
    Alas, our work continues on until early AM.
    My husband and I continued into the night.  We added the soil, and spread it evenly.  The directions call for 1.5 Cubic Yards of soil.  In order to top the garden beds off, we used a bit more than that.  I really wanted to use Miracle Grow, but my husband swears what he bought is way better.

    We also installed the included automatic soaker hose irrigation system with timer.  Many of the reviews for this system suggested testing the hose prior to installation, but my husband said the hose was a high-end brand and it would be fine.  It was.  I was way too tired to argue. 
    Professional Grade Weed Blocker Cloth
    My husband decided it would be in our best interest to lay down a roll of professional grade weed blocker cloth underneath the mulch.  We unrolled, measured the length and cut to fit.  We did this on all 4 sides, as well as in the middle.  It took the two of us approx. 40 minutes to complete this step.  Next, we spread the mulch on top of the weed blocker cloth.
    Mulch Complete
    It was well past 2 AM at this point.  All I wanted to so was take a shower and go to bed.  In the end, it was well worth all of the hard work.  The next day, I woke up to this:
    I am in LOVE.
    My husband made a trip to our local nursery and purchased a whole bunch of different plants.
    Plant Placement:  Decisions, decisions...
    I really wanted to get the plants into the soil, but I knew my son would want to help with this part, so I waited until he was home from school.  He was such a huge help and even more excited than I was.

    Plants have been planted.  My child is happy.
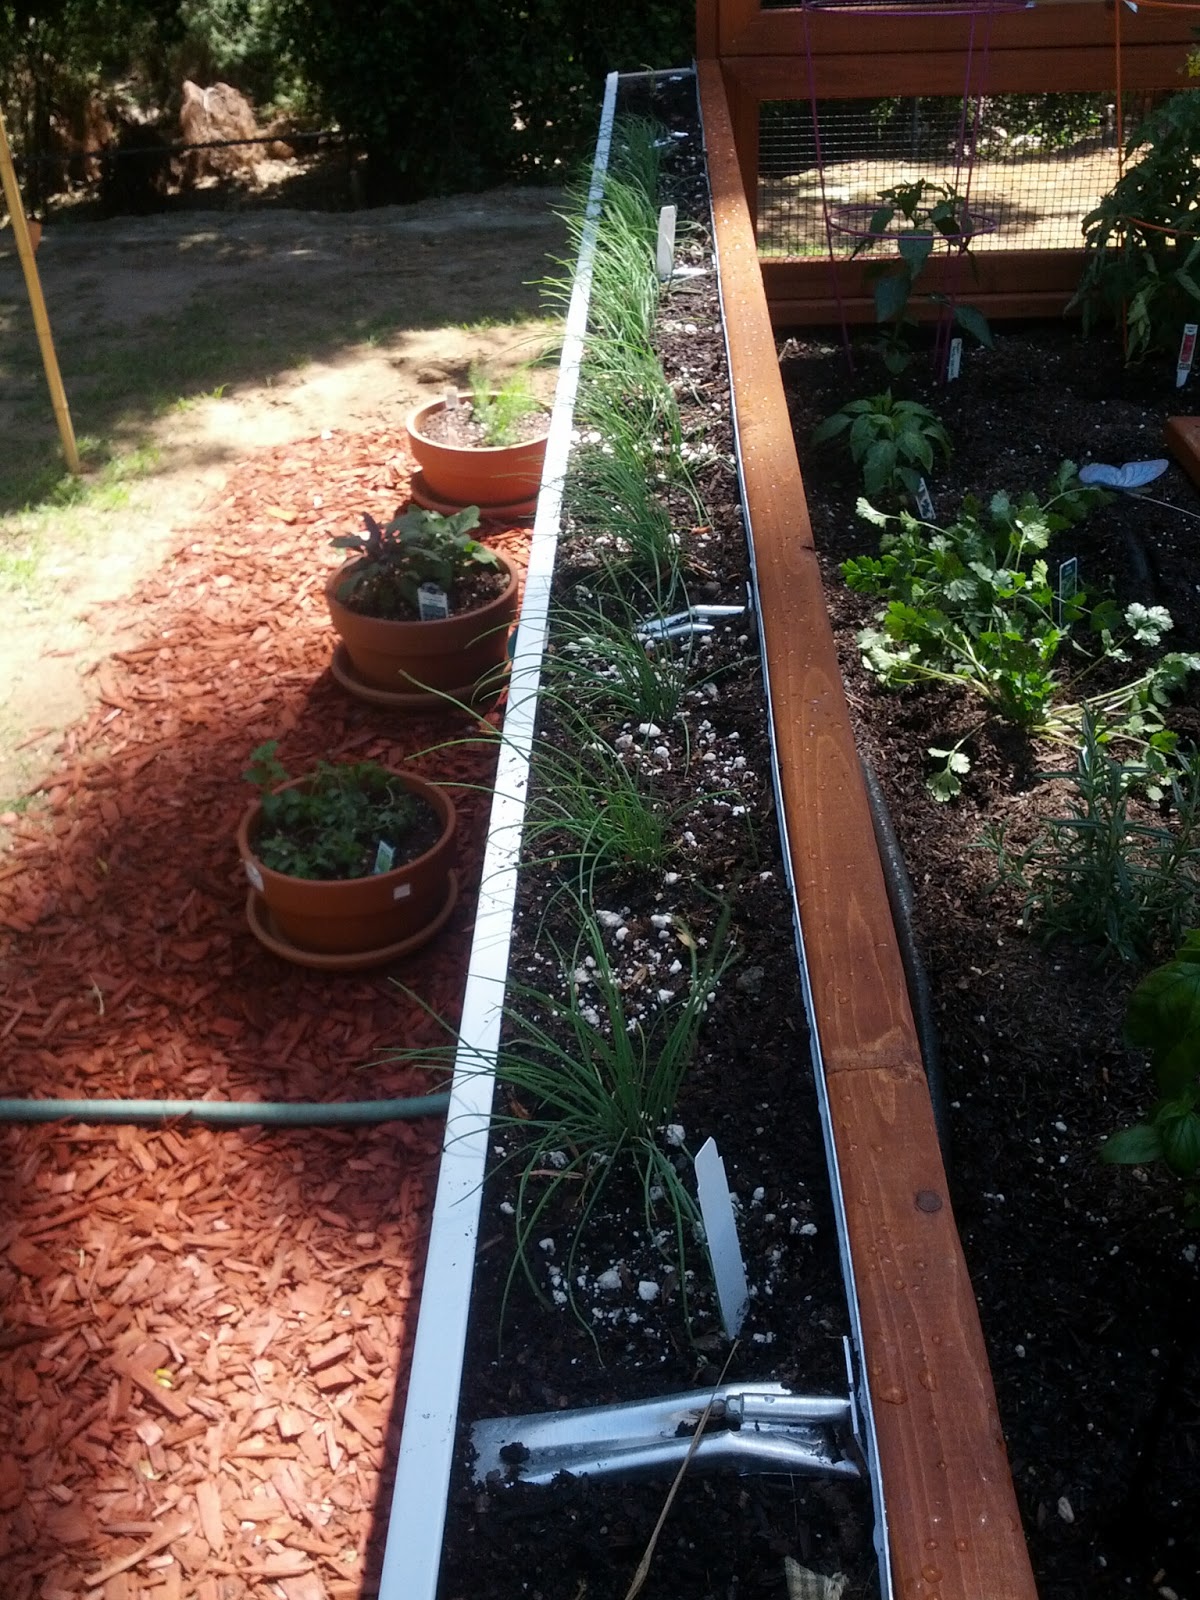
    In order to maximize my planting space, I asked my husband to make some rain gutters to hang from the side of my garden.  Fortunately for me, his company makes custom, seamless rain gutters, so it was easy peasy.  He installed them that night, while I was asleep.
    Seamless Rain Gutters by HASCO filled with Potting Soil
    The next morning, I planted chives and onion bulbs in one gutter and strawberry plants in the other.
    Day time shot of the completed garden and gutters.
    THE ADDITIONAL COSTS
    Galvanized Mesh Screen: $20
    Professional Grade Weed Blocker Cloth: $49
    Patio Plus Soil:  approx. $150
    Mulch for ground cover:  approx:  $100
    Thompson's Water Seal: $16
    Sprayer for Water Seal: $10
    Rain Gutters:  approx. $70
    Plants, pots and additional soil: approx. $200

    WHAT I PLANTED
    Basically, what I wanted in my garden were vegetables that would allow me to make salads, a nice stir fry once in a while, salsa and also some herbs for roasting chicken.  Too bad, so sad - lettuce, carrots and broccoli are out of season in my area.

    I am currently growing thyme, basil, rosemary, cilantro, chives, a variety of onions, chili peppers, jalapeño, 4 types of tomatoes, celery, green, red, and yellow bell peppers, yellow squash, zucchini, 2 types of cucumbers, asparagus, 2 types of sage, gingermint and strawberries.  Oh and some aloe vera plants recovered from my dad's house after the fire.  In addition to all of this, I had my husband plant lemon and lime trees near by.  We already have about 7 avocado trees as well as different types of oranges.

    Eventually, I will plant lettuce, carrots, broccoli, corn, potatoes, watermelon, pumpkin and some other things I am sure I will think of later.

    THE PROGRESS
    Week one:  The pesky rodents have yet to discover my garden.  There are no weeds.  My back is not sore.  It looks absolutely gorgeous.  Seriously, almost all of my friends are envious.  I'm envious and it's my garden!!

    The only problem we have encountered so far is either the original washers included with the kit for the timed watering system or the timer system itself (yet to be determined) needs to be replaced.  They leak no matter how much we tighten the fittings.  My husband is going to buy some different washers to try and fix the leak.  I will report back once we have figured out what the problem is.

    Back View:  Cucumbers, beans, squash & zucchini
    So far, so good.  The following pictures were taken 10 days after planting.  All of the plants are doing well and seem to be growing.  Baby tomatoes and strawberries are starting to peek through.


    Tomatoes
    Strawberries
    I am so proud of my garden.  It was a lot of work, but we were able to do it as a family and that is what matters the most.  I can't wait to pick my own organic produce right from my yard.

    So, what do you guys think?  Have any of you started or plan on starting a garden this year?  Please comment below with any tips and tricks you have for gardening in the soon to be Summer weather.  This is my first garden, so I am going to need all of the help I can get!

    If you loved this post, please give my garden a 5 star rating over at HGTV's Rate My Space.  Thanks for reading :)