Thursday, June 27, 2013

Garden Fresh Zucchini Pasta with Garlic, Spinach and Basil

It is still hard for me to believe I have my own garden and have been able to grow fresh herbs, veggies and fruit successfully!  Who knew it could be this easy?   I was inspired to create this dish using things found in my own front yard.  Yep.  All from my garden I started a few months back.  (You can read all about that journey here).

I belong to many Facebook groups and earlier this morning someone posted a Zucchini Linguine recipe in one of them.  It looked so awesome and sounded so easy to make, I thought, "Shoot, I have most of these ingredients right outside in my garden!"

This was the recipe that inspired mine.  Granted, I made a few substitutions along the way and my pictures in no way look as good as this:

via Feasting at Home

My version still turned out super yummy.  Here is how I made it...

Garden Fresh

Store Bought Parmesan Cheese

 Ingredients:
  • 1 Large Zucchini
  • 3 Cloves of Garlic
  • 4 Tablespoons of Light Olive Oil
  • 5-6 Fresh Basil Leaves
  • 8 Fresh Spinach Leaves
  • 3/4 Cup Parmesan Cheese
  • 8 Turns of Fresh Ground Black Pepper
  • 1/4 Teaspoon of Sea Salt

I started by peeling my zucchini and cutting the smaller end off.  I wanted my "noodles" to be similar in size and shape in order to cook evenly.  (Next time I will leave the peeling on - I think it would make for a firmer "pasta").

Zucchini

I used the shorter piece I had cut off to "practice" my technique.  I think my mini noodles turned out pretty well.

Small Zucchini Noodles

Then, I sliced the larger piece into what resembled the approximate size of fettuccine noodles.  At this point, I realized I needed a way bigger knife, but it worked out in the end.

Larger Fettuccine-Like Noodles

Next, I diced 3 cloves of garlic.  My basil wasn't looking that great (blame it on the hot California weather), so I decided I would add some spinach.  I wasn't sure if the two pair well together, so I Googled and voila! there were plenty of recipes out there using both spinach and basil in the same recipe.

Zucchini, Garlic, Basil and Spinach

I copied the "ribbon" technique from the original recipe to cut both the basil and spinach leaves.  It was really easy.  Stack your leaves, roll them and then slice.  Do not slice lengthwise, start at the smaller end and keep slicing until it is all cut up.

Rolled Spinach Leaves

Basil & Spinach Ribbons

Next, I warmed about 4 tablespoons of olive oil and sauteed the diced garlic in the oil over medium heat for about 2 minutes.  Then I added the zucchini, salt and pepper.  I put the lid on and continued to cook the zucchini for about 9 minutes, stirring often.

Cooking Zucchini Pasta

There really is a ton of moisture when cooking zucchini this way and it steams up quite nicely.  Once the zucchini actually started to resemble cooked pasta, I added the basil and spinach and continued to cook for about a minute.  My kitchen smelled heavenly.

Basil & Spinach

Finally, I added the Parmesan cheese.  I used DiGiorno.  It saved me the step of grating my own.  I continued cooking over medium heat for about a minute or so - just until the cheese started to melt.

Parmesan Cheese

Since there was still quite a bit of moisture, I used a slotted spoon to plate the pasta.  I then added some additional Parmesan cheese and fresh ground black pepper.  This is the end result.


I know it does not look super pretty, but I promise it was so flavorful, even my mom, who really doesn't eat this type of stuff, liked it.

Next time I make this I will leave the peeling on the zucchini, cook in a nonstick pan and use half the amount of olive oil.  My thinking is doing all of these things will help eliminate some of the excess moisture.  I could be wrong.  Either way, this was simple and tasted great.  All in all, it took me about 30 minutes to make.  That includes picking the zucchini and herbs from the garden, all of the prep, cooking and taking pictures.  It made three servings the size you see in the picture above.  I could easily grill some chicken at the same time and really have a great meal even the hubs would love.  Please post a comment if you try this and let me know how yours turns out.  Until next time...

Wednesday, June 26, 2013

The Heated Aqua-Jet Foot Spa by Brookstone

Hey everyone.  I really need to start posting more.  I have told so many people about this product and every single time I say to myself, "I should write a blog on this...".  Okay, here it is!

The Heated Aqua-Jet Foot Spa 
Heated Aqua-Jet Foot SpaB
Heated Aqua-Jet Foot Spa

First, check it out in all its glory:

via Amazon

Looks awesome, right?  Well, it is.  As most of you know, I always do my research when splurging on an item.  This was no exception.  I read reviews, shopped around and waited to see a price drop.  Hoping the price would drop.  Alas, it didn't.  So I went for it.  I chose to order mine from Amazon for a couple of reasons.  First, I am a cardholder and not only is the ordering process as smooth as pie, but I earn reward points.  Also, the price was exactly the same as on the Brookstone website.  Besides, Brookstone has a store on Amazon, so I figured it was pretty much the same thing, right?

On to the details...

Pros:
  • Heats water and keeps it hot to 115 degrees
  • Jets (that rotate and have two speeds)
  • Deep basin
  • Accommodates larger feet (hello, size 11!)
  • An easy to use drain plug
Cons:
  • Price  at $129.99 this foot spa ain't for everyone.  (I do most of my own pedicures at home, so it was easy peasy to justify the cost)
  • The "Two rolling nodes" that are supposed to provide a "kneading massage to your arches" - they don't.  (At least not for me)
  •  The removable pumice stone - it really isn't that awesome.
  • It is heavy.  Loaded with water, it is even heavier.
Even with a few cons, (because let's be honest all products have cons), the stuff that does work is so awesome you won't think twice about those things.

A couple of additional points I would like to mention:  First, the customer care department at Brookstone is awesome.  One of my rolling nodes would not stay in its place and kept floating to the top of the basin when it was filled with water.  I went on Amazon and submitted a claim and within a couple of days not only did I receive a replacement in the mail, but they sent me two of them!  Second, based on reviews and the directions that come with it I am afraid to add any products to the water while the unit is operational.  People have posted comments stating adding salts or fizzies to the water has ruined their foot spa.  However, that has not stopped me from using some products while the unit is turned off.  I just make sure to rinse it really well when I am done.

Overall, this thing is super user friendly and looks really nice.  I set it on my kitchen counter,  use the kitchen faucet wand to fill it up and then dump the water in my bathtub when I am done.  I always wipe it down with a warm cloth, turn it upside down and leave it inside of the tub to ensure thorough draining and drying.  After it is dry, I place it in my hallway and I cover it with a clean, dry white towel so it won't get dusty and is ready to use the next time I need it.  I literally use this foot spa at least once a week.  Sometimes, to do complete pedicures and sometimes just to have a nice relaxing soak while watching The Real Housewives.  :)  Oh yeah, I said it.

So, what are you waiting for?  Summer is here and you need to get those feet into shape, sista'!  A long time fan of high(er)-end(ish) nail polish, one of my next blogs will be covering my newest subscription to Julep, a company that sends you nail polishes and other goodies on a monthly basis for less than $20 per shipment.  Other than the huge savings, the best part is you can cancel or defer a shipment at anytime.  I have referral codes with a nice discount if you are interested in trying them out.

Looking for some nail polish inspiration?  Look no further.  Mama has a Pinterest board dedicated to this very subject.  Hollaaaa!

via Pinterest

Thursday, May 30, 2013

Backyard Botanical Garden Series: Part 3

It's been almost two months since I started this project and I couldn't be happier.  I'm going to let the pictures speak for themselves on this one...


Squash & Zucchini
I added a stand to help the cucumber vines stay off of the ground
Cucumber
Chili Peppers & Onion Patch
Chili Peppers
Tomatoes
Cherry Tomatoes
Squash

I am pleasantly surprised that my Bell Pepper finally started growing.  It was touch and go for a few weeks because of the aphids that were attacking the leaves.  An order of 1500 lady bugs seemed to do the trick. 

Bell Pepper

Corn

 As you can see, everything is thriving.  I have had one celery plant die (my fault) and a couple of corn plants met their demise due to animals.  Other than that, things are going well.  I have propagated a couple of plants, had my husband build 6 additional raised beds to house my tea garden, new berry patch, 3 rows of corn, my seedlings and an overall thinning out of some of the plants.  I plan on doing a post on growing plants from cuttings and seeds soon.

What are you growing this season?

Tuesday, April 30, 2013

Backyard Botanical Garden Series: Part 2

Hey everyone.  It has been almost 2 weeks since we constructed and planted our garden.  I am extremely happy to report that the majority of the plants are doing well.  We have a few dead/dried out celery plants, but I think I have found and fixed the problem that led to their early demise.

I had to go out of town this weekend and was really worried about maintaining the watering schedule of my garden.  Up until this point, I have been manually turning on the soaker hose system for 15 minutes each day, as well as watering with the hose.  

We still haven't figured out what the issue is with the original timer that came with our system, so this afternoon we made a few changes to the garden.  My husband installed a better timer and we ran additional soaker hose to the rain gutters and the back of the garden.  It doesn't look as "pretty", but for now it will get the job done if I am unable to water daily for any reason.

Here are some pictures I took earlier this evening...

The sage has done really well.  I can't believe how lush it has become.  I may have to take one of the plants out and replant it in another container.
Day 19:  Sage Plant

I can't express how much I adore our little garden.  My son loves to check on the plants each day after school.  So far, so good.  :)

Day 19:  An overall picture of our Backyard Botanical Complete Gardening System

We are up to about 5 hours of direct sunlight each day.  My husband assures me that time will increase over the next month or so.
Day 19:  Side View

Even though I have watered the plants daily, the back of our garden seems to be growing at a slower rate.  I am hoping with the addition of the soaker hose we ran tonight, the plants will become a bit more productive.
Day 19: View of Back.  Growing asparagus, cucumbers, pole beans, squash & zucchini.

Out of all of the plants back here, the beans seem to have grown the most.
Day 19:  The bean plant has flowers.
Day 19:  Another shot of the back.

I have come to the conclusion that when I was watering the rain gutter strawberries, the water was running over onto the top of the celery plants, effectively burning the leaves in the sun.  I (hope to) have fixed the problem by watering in the evening and also pointing the hose toward the outside of the garden instead of facing inward.
Day 19: Celery Plants.  One plant has died completely, two more are right behind it.
I love my solar powered butterflies.  They spin around as long as they are facing the sun.  I think they help keep the critters away.  Super cute!
Day 19:  Bell Peppers, Celery & Strawberries
Day 19:  Bell Pepper Plants
Top of bell pepper plant - flowers should appear soon.
Day 19:  Onion Bulbs.  These seem to have taken off overnight!
Day 19:  Flowering Cucumber Plant
Day 19:  Basil Plant.  The basil has nearly doubled in size.
The new timer my husband installed this evening.
Day 19:  Flowering Chili Pepper Plant
Day 19: Tomato Pant
Day 19:  Rosemary & Cilantro Plants.  The rosemary has grown a bit taller and the cilantro has perked up.

So far, we have picked and eaten a handful of strawberries and they are super sweet.
Day 19:  Flowering Strawberries

I apologize the next two pictures are a bit dark.  I took them after we were done installing the additional soaker hose in the gutters and it was already dark outside.

I am worried the gutters will receive too much water now, so I am going to monitor them closely over the next couple of days.  Another thing I am worried about is the weight of the gutters.  My husband is going to install some 2x4's under the gutters to add some extra support.  This should provide adequate support once the plants become heavier.
New soaker hose in the rain gutter strawberry garden.
Soaker hose installed in the rain gutter chives.

Well, this is my update for now.  I hope to add a post every few weeks or so in order to track the progress and allow others to get an idea of how long it will take for the veggies and berries to grow and be able to be eaten.

Thanks for stopping by.  If you have a garden blog of your own, please link to it in the comments section.  I would love to see what you are growing this season!  Questions?  Feel free to leave a comment, I always try to reply to each one I receive.

Thursday, April 25, 2013

RV Inspiration

Some of you may have already read my post about our new-to-us, used RV.  Throughout this entire ordeal, I have spent most nights researching all things RV.  I am addicted.  There are so many resources available online if you know what to look for.  Keywords are important.  After finding all of the technical specs we needed to reconstruct our RV pretty much from the walls up, I started researching design ideas.  Because, Hello, this is what I love:  The design part of remodeling.

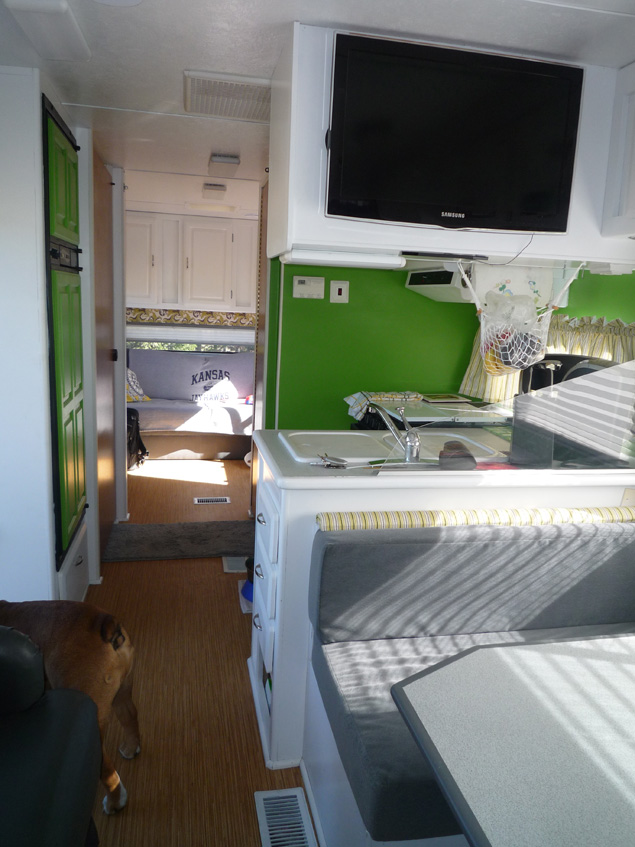
This has taught me many things, but the most important one is:  RV Decorators are awful.  Who picks the fabrics for RVs??  Even the newer models are at most "OK".  I get the part about using durable, stain resistant fabrics, but COME ON.  Really?  Do the designers go to the fabric wholesalers and find the most hideous colors on purpose?  Why can't camping be cute?  Well, I am here to tell you it can be cute.  Seriously, it really can.  Amongst all of the hideous-make-me want-to-throw-up-in-my-mouth RVs out there, I have stumbled across some super cute remodels.  If your RV has great bones, consider remodeling with some easy changes like paint, hardware and incorporating some color.  You don't have to spend upwards of $60k just to get a decent interior palette in an RV.  I don't agree with some of the color choices per se, but everyone has their own style, so who am I to judge?  Check out all of this awesomeness:

Look at all of that white.  I just love how clean it looks.
The dark floors add a nice contrast.
image via happydayvintage

This is so simple and clean.  Again, the dark floors are striking with the white backdrop.
RV Reno, My family purchased a 1995 bumper-pull travel trailer.  My husband had trouble seeing past the 90s blue carpet, and blue and pink splattered wall paper and draperies.  I looked at the travel trailer completely differently and immediately knew what I wanted the end result to be., So much more open!, Other Spaces Design
image via roomzaar
Another view.  This bedroom looks super cozy and by now, I am sure you have noticed:  I am all about the color white..
RV Reno, My family purchased a 1995 bumper-pull travel trailer.  My husband had trouble seeing past the 90s blue carpet, and blue and pink splattered wall paper and draperies.  I looked at the travel trailer completely differently and immediately knew what I wanted the end result to be., Smidgin of yellow!, Other Spaces Design
image via roomzaar

Shabby Chic say whaat?
This is one of the first RV remodels I fell in love with.  Love.  My husband: not so much.  The colors are super cute.  Notice everything is neutral, so when you want to make a major color change, you only have to change out a few key pieces.
I am completely envious of this look.
image via romantiskahem
The same RV, changed to a black and white color scheme.
image via home-sweet-motorhome

I especially enjoyed reading this blog, because their RV has a layout very similar to ours.  I really loved the detailed posts on how they renovated everything.  The use of color is great and I absolutely adore the white cabinets.  I found it interesting the way they removed the bedroom and created a living room-like area.
image via trippinwithstanley

This one is more like a small apartment than an actual home on wheels.  They even travel with their animals!  I really like the kitchen back splash.
Nature Inspired RV Renovation Part 2, Other Spaces Design
image via roomzaar

Again, painting the cabinets white, makes a HUGE difference in the overall feel of an older RV.  The owners of this RV even painted faux marble-like counter tops.

Kitchen-Countertop-After-Painting
image via thenewlighterlife

For more inspiration, check out my RV Board on Pinterest.

Do you have design ideas for RVs?  I would love to read about them.
As always, thanks for reading.  :)