Saturday, April 20, 2013

Backyard Botanical Complete Gardening System Detailed Review

Okay, so I know it has been some time since I have posted anything to my blog.  I don't really have any excuses, except that I have been extremely busy (see: overwhelmed with life).  However, in my opinion, the wait has been worth it.  I am so excited to tell you about this:

Backyard Botanical Complete Gardening System
Pretty, right?  RIGHT?!!  It wasn't easy, but if the set-up was the hardest part, I am more than happy to be past it.

Please note I am a details type of girl, so this post is super detailed.  Maybe next time I should break something this big up into smaller posts?  I'm not sure....okay so here goes...all you ever wanted to know about the....wait for it....drum roll, please:

Backyard Botanical Complete Gardening System by Leisure Time

photo via Sam's Club

SPECIFICATIONS
(via Sam's Club Website)


  • 20" High raised beds
  • Natural decay resistant cedar
  • Automatic irrigation system
  • Pest-proof flooring & fencing
  • Innovative polyethylene planting tubs
  • Coil Garden hose with sprayer
  • Built-in trellis for climbing plants
  • Holds 1.5 cubic yards of soil
  • Detailed assembly manual
  • Ships in two boxes


  • MY REASONS (aka justifications)
    I have been coveting this garden since 2009 (!!) and could never bring myself to spend the money.  It is pricey, but after getting it all together, even my husband agrees it is well made and well worth the cost.  Even though we live on a little over 2.5 acres, it is extremely hard to grow anything.  We have rabbits, squirrels, gophers, owls and even the occasional coyote.  Our dog, Gracie brings us "treats" often.  Ew.  Those pests demolish everything from flowers to grass to our friend Ray's electrical wiring in his car!  Twice.  Anyway, I knew I for sure did not want to put a ton of time and effort into planting a garden only to have the animals ruin everything.

    That was my Reason #1 for buying this system.
    Reason #2:  I do not want to deal with weeds.  Sorry, but this mama is not interested.
    Reason #3:  Raised gardening is easier on your knees and your back.  Isn't it?
    Reason #4:  I just liked it, okay?

    THE COST
    I originally saw it at my local Sam's Club toward the end of Summer in 2009 for a little less than $400.00.  Sam's club always brings back their seasonal Summer items each year, right?  NOT.  My bad for not buying it then.  Since that time, I have watched and waited for it every Spring & Summer.  Just hoping.  I knew they had it online, but heck if I was going to pay shipping on this sucka.  When I purchased mine (March 22nd, 2013), this website was selling this same system for quite a bit more than what I paid: $1099.  It is now listed for $599.00 (including shipping).  Home Depot and Sears both carry it for $799.  I bought mine from Sam's Club for $575 (including shipping).  Tax was not included, so my total with shipping and tax came to $621.  Fair to say, it did take about a week longer than the estimated time of arrival I was given.

    THE PREP
    Before we could even think of setting something this big up, I knew we had to figure out where we were going to place it.  The instructions say, "For best gardening results select a level area that will receive at least 6 hours of sunshine per day."  I chose somewhere close to my house, because let's face it, I am not about to be gardening all the way down at the other end of our property.  Period.  Also, I needed a sunny location and access to water.  I was already asking a lot of my husband without adding, "Please run a water line for me, too."

    I mentioned where I thought I wanted it and before I could even consider other places, he was already out there prepping the ground!  Hmmm, note to self: decide if I really want the driveway re-paved and an electrical gate with call box.  I digress.

    First, he measured the space we would need for the actual garden (8x8) and then an extra foot in order to leave room for pavers or ground cover.  Next, he spray painted lines to use as guides.  Then, he fired up our rototiller and got to work.  All in all, it took less than an hour to prep the ground from start to finish.  It was super soft when he was done.  Like so soft, that my Havaianas literally sunk into the ground.  Anywho, here are some before, during and after pics:

    Spray painted lines to use as guides.
    Another view of area to be tilled.
    I had no idea we actually owned one of these.
    My husband, Sal, hard at work.
    First turn.
    You get the picture, eh?
    Finished with the hard part.
    Ground tilled and smoothed with the flat side of a rake.
    Random bird.  Thank goodness Gracie was asleep.
    THE ASSEMBLY
    Once my Backyard Botanical Complete Gardening System finally arrived, we immediately put it together it sat for two days.  I wasn't about to touch that thing on my own,  I don't even have a working drill gun at the moment and my furniture putting-together-skills are limited to IKEA furniture.  No joke.  Besides, it looked like it might rain and I for one was not about to start a project only to get rained on.

    We asked our friend, Lucas to help assemble the garden put the garden together by himself.  He arrived around 8:30 AM with all of the required tools and was here until about 8:00 PM.  Settle Down, I fed him.  Geez.  Also, my husband, another friend and our son helped toward the end.  Oh, and I supervised.  (Pretty much walked around pointing out things while trying not to ruin my pedicure.)  Just saying.

    I would like to mention, Lucas said the biggest problem with the assembly was that the "tools required" section did not list all of the tools required (!!).  Thank goodness he is a man of many tools and happened to have all of the extra drill bits and other paraphernalia required to complete the job.  Also, be advised: not a single hole was pre-drilled or marked.  It was a lot of work.  I highly recommend hiring a skilled person to assemble this thing.  Had I begun on my own, I would have been upset, to say the least.

    Lucas, reading the directions before starting.
    Organizing the materials and still reading.  A boy who actually reads!
    Base put together.
    Adding the plastic liner.
    We happened to have a ton of bricks laying around, so we used those to create a foundation of sorts under the edges of the garden.  Mainly to help level the area.  Also, (I forgot to take a picture of this step) prior to installing the black plastic material included in the kit, we added extra mesh wire below the plastic to ensure pesky critters would be less likely to eat through the plastic.  The guys used a utility knife to cut it to fit and a staple gun to attach it to the cedar frame.
    My 8-year-old son wanted to help, too.
    Assembling the back.
    A drill gun is a must for this project.
    After the garden was fully assembled, we sprayed two coats of Thompson's WaterSeal and then used a paint brush to make sure it was evenly applied and in all of the crevices.  Dry time was approx 30 minutes between coats.
    Dry brushing Thompson's WaterSeal
    Lucas, done for the day.
    It was around 8 PM at this point - I wanted to quit for the day, my husband - not so much.
    Alas, our work continues on until early AM.
    My husband and I continued into the night.  We added the soil, and spread it evenly.  The directions call for 1.5 Cubic Yards of soil.  In order to top the garden beds off, we used a bit more than that.  I really wanted to use Miracle Grow, but my husband swears what he bought is way better.

    We also installed the included automatic soaker hose irrigation system with timer.  Many of the reviews for this system suggested testing the hose prior to installation, but my husband said the hose was a high-end brand and it would be fine.  It was.  I was way too tired to argue. 
    Professional Grade Weed Blocker Cloth
    My husband decided it would be in our best interest to lay down a roll of professional grade weed blocker cloth underneath the mulch.  We unrolled, measured the length and cut to fit.  We did this on all 4 sides, as well as in the middle.  It took the two of us approx. 40 minutes to complete this step.  Next, we spread the mulch on top of the weed blocker cloth.
    Mulch Complete
    It was well past 2 AM at this point.  All I wanted to so was take a shower and go to bed.  In the end, it was well worth all of the hard work.  The next day, I woke up to this:
    I am in LOVE.
    My husband made a trip to our local nursery and purchased a whole bunch of different plants.
    Plant Placement:  Decisions, decisions...
    I really wanted to get the plants into the soil, but I knew my son would want to help with this part, so I waited until he was home from school.  He was such a huge help and even more excited than I was.

    Plants have been planted.  My child is happy.
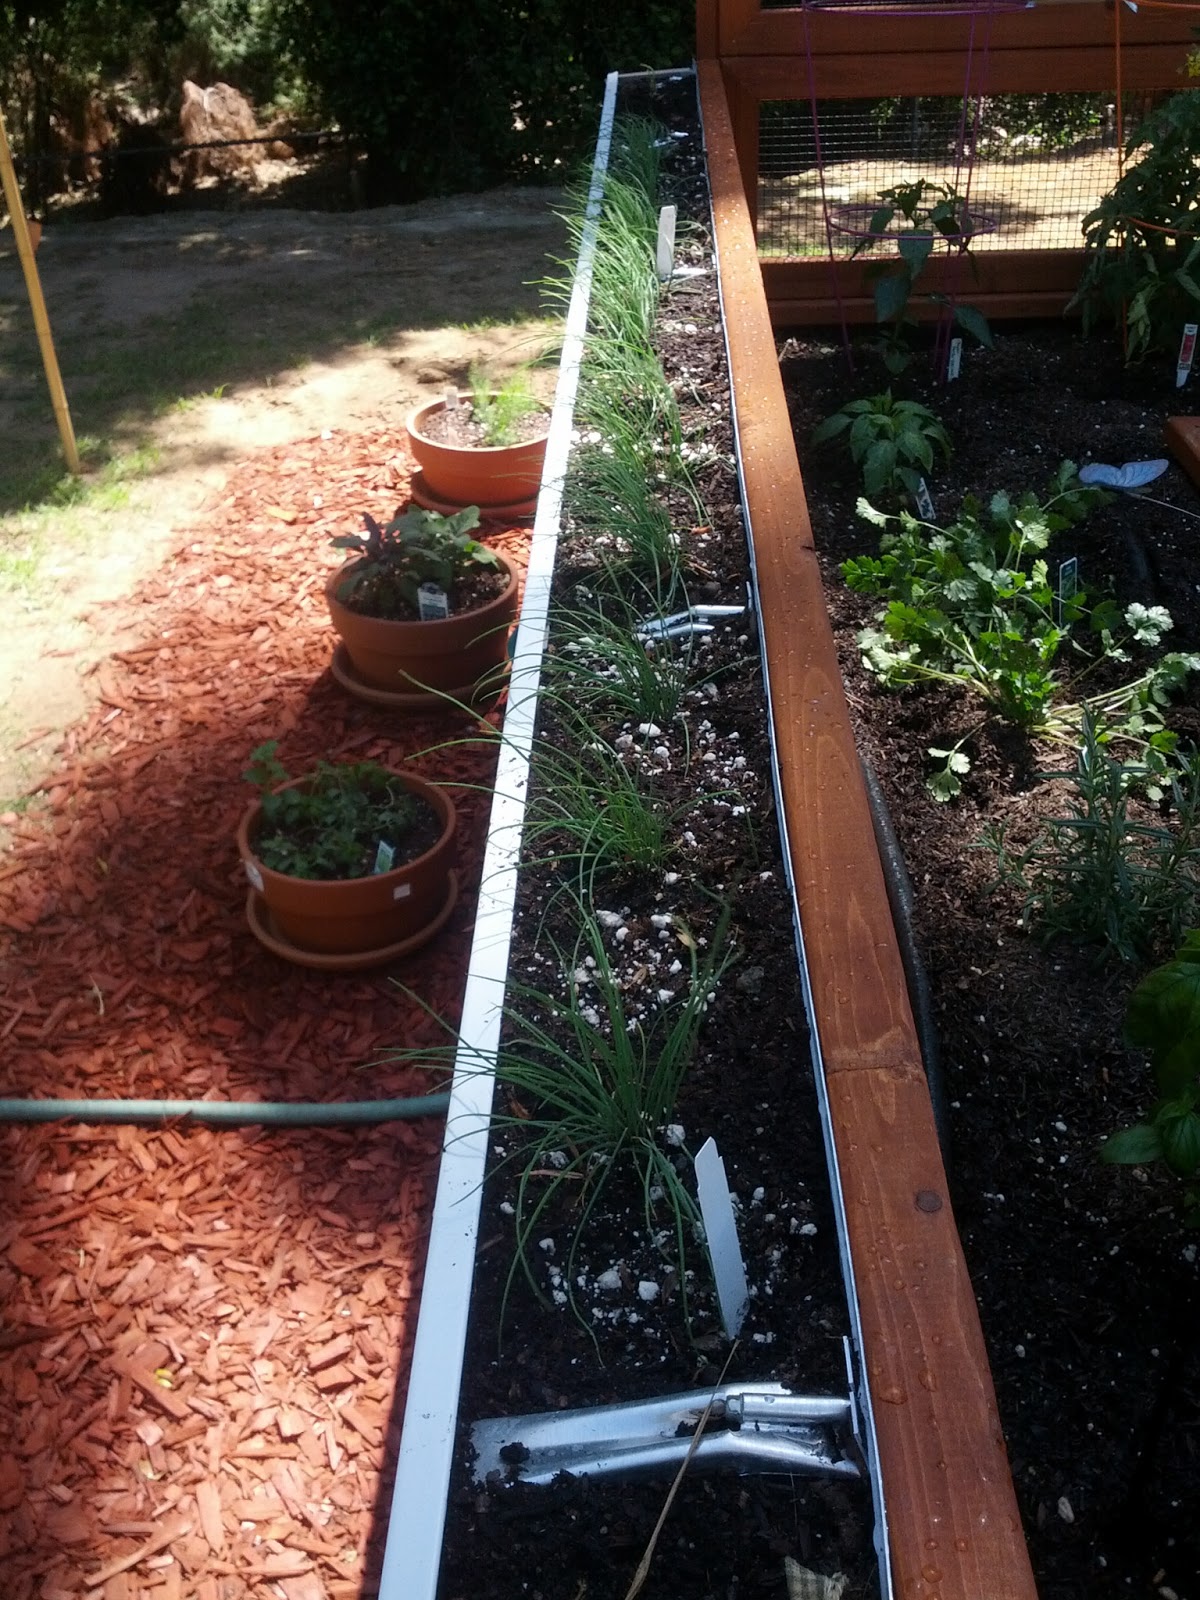
    In order to maximize my planting space, I asked my husband to make some rain gutters to hang from the side of my garden.  Fortunately for me, his company makes custom, seamless rain gutters, so it was easy peasy.  He installed them that night, while I was asleep.
    Seamless Rain Gutters by HASCO filled with Potting Soil
    The next morning, I planted chives and onion bulbs in one gutter and strawberry plants in the other.
    Day time shot of the completed garden and gutters.
    THE ADDITIONAL COSTS
    Galvanized Mesh Screen: $20
    Professional Grade Weed Blocker Cloth: $49
    Patio Plus Soil:  approx. $150
    Mulch for ground cover:  approx:  $100
    Thompson's Water Seal: $16
    Sprayer for Water Seal: $10
    Rain Gutters:  approx. $70
    Plants, pots and additional soil: approx. $200

    WHAT I PLANTED
    Basically, what I wanted in my garden were vegetables that would allow me to make salads, a nice stir fry once in a while, salsa and also some herbs for roasting chicken.  Too bad, so sad - lettuce, carrots and broccoli are out of season in my area.

    I am currently growing thyme, basil, rosemary, cilantro, chives, a variety of onions, chili peppers, jalapeƱo, 4 types of tomatoes, celery, green, red, and yellow bell peppers, yellow squash, zucchini, 2 types of cucumbers, asparagus, 2 types of sage, gingermint and strawberries.  Oh and some aloe vera plants recovered from my dad's house after the fire.  In addition to all of this, I had my husband plant lemon and lime trees near by.  We already have about 7 avocado trees as well as different types of oranges.

    Eventually, I will plant lettuce, carrots, broccoli, corn, potatoes, watermelon, pumpkin and some other things I am sure I will think of later.

    THE PROGRESS
    Week one:  The pesky rodents have yet to discover my garden.  There are no weeds.  My back is not sore.  It looks absolutely gorgeous.  Seriously, almost all of my friends are envious.  I'm envious and it's my garden!!

    The only problem we have encountered so far is either the original washers included with the kit for the timed watering system or the timer system itself (yet to be determined) needs to be replaced.  They leak no matter how much we tighten the fittings.  My husband is going to buy some different washers to try and fix the leak.  I will report back once we have figured out what the problem is.

    Back View:  Cucumbers, beans, squash & zucchini
    So far, so good.  The following pictures were taken 10 days after planting.  All of the plants are doing well and seem to be growing.  Baby tomatoes and strawberries are starting to peek through.


    Tomatoes
    Strawberries
    I am so proud of my garden.  It was a lot of work, but we were able to do it as a family and that is what matters the most.  I can't wait to pick my own organic produce right from my yard.

    So, what do you guys think?  Have any of you started or plan on starting a garden this year?  Please comment below with any tips and tricks you have for gardening in the soon to be Summer weather.  This is my first garden, so I am going to need all of the help I can get!

    If you loved this post, please give my garden a 5 star rating over at HGTV's Rate My Space.  Thanks for reading :)

    Sunday, March 10, 2013

    Coping with Death

    This originally started out as a Facebook post, but I quickly realized it was much too long and people would start un-friending me deleting me with the quickness or something if I started posting novels such as this on a regular basis.

    The main thing I've learned in the past 24 hours is the best coping mechanism for myself when dealing with death is to immerse myself in something completely different.  To stop thinking of the "why's" and the "hows" and just take a minute to breathe.

    Last night, it was a call from one of my best friends who was making a late night commute from work and hadn't heard the news yet.  We talked mostly about things going on in her life. I didn't realize it at the time, but the laughing and talking got me away from the constant thinking and wondering for an hour or so.  It didn't fully hit me how much until we ended the phone call.  I have never felt anything even close to how I did when all of the sadness and disbelief came rushing back.  I would never fully be able to understand this without actually feeling it myself.  No explaining this to me would ever be sufficient.  It is like having the wind knocked out of you, breathing fine while having a tight feeling in your chest and borderline hysteria.  All at once.

    That's the best way I can attempt to describe it.  I have had other family members pass -  they were either old, sick for many years or had been hospitalized - so you kind of know it's a possibility, even if it is only in the back of your mind and you never voice it. 

    This is not the same feeling.  The unexpected abruptness of this is something I can't quite put into words yet.  It doesn't mean others who have died meant any less - it's just this is something I've never experienced until now.  It comes out of nowhere.  It's not a panic attack, but has similarities.  It's not depression, but feels very sad.  It's almost as if you want to sleep and wake up and have it all be gone.  To have never happened.  I know this is fresh in my mind and so many things have yet to be taken care of.  I also know that this too, shall pass and if and when that feeling hits me out of nowhere I need to temporarily change my focus to something that is less serious.

    Earlier tonight, it happened again - I had been watching something random on TV and it was so absurd that I couldn't take my eyes off of the program (Millionaire Matchmaker - do not judge me).  I didn't even realize it until it ended and the overwhelming feeling came out of nowhere.  I am not a person who takes medication unless it's extremely serious, but I thought to myself, this would be the time for me to have something handy.  It's no surprise I didn't have anything much available.  So instead, I took a bath, called my sister and then a friend.  I felt OK for the past couple of hours.  A few minutes ago, I recognized the tightness in my chest and the feeling of wanting to breakdown and cry.  I thought of playing a game or downloading a book to read on my Kindle.  Then, I thought I should record and share this feeling in order to remember it in a way, but also if it could help one other person learn to refocus their sadness to something they enjoy - even a small distraction for a few minutes while trying to process the unimaginable - then it would be worth it to take the time and type.

    As a side note - while typing this, the awfulness has passed.  For now.  Next stop, Safe Haven via my Kindle. 

    Something sweet:  my always super articulate 8 year-old came up to me earlier, placed his hands on my knees, looked into my eyes and said, "Mommy, what's wrong? Why are you so sad?  You already know he (grandpa) has died and... (he looks around and kind of up at the ceiling, toward heaven)...so you don't need to cry anymore, mom". 

    This child is seriously the best thing I have ever done and my dad, Dan loved him so very much.

    My Dad, Dan (age 55) and Baby Sal (age 1), August 7th, 2005

    July 11th, 2009 - Visiting Grandpa Dan in hospital, San Diego, CA

    Rest in Peace, Dad.  You will be missed dearly.

    Daniel Martin Drake was born December 23rd, 1950 and died on March 8th, 2013 due to injuries suffered during an accidental fire in his home in San Diego, CA.

    Thanks for reading.  This is my first post via my phone, so please excuse any errors.

    Sunday, February 17, 2013

    Are all trash cans created equally?

    Is a trash can that retails for $179.99 worth it?  That is the question I had to ask myself yesterday while in line at my local Bed, Bath & Beyond.  It is also the question my mom asked when helping me carry this into my house earlier today.


    image via Bed Bath & Beyond
     
    If you are asking yourself why one would want such a trash can, here are my reasons (in order of importance).

    Pros:
    •  Trash and Recycling receptacles all in one
    •  Removable bin inserts (making cleaning a breeze)
    •  Silent closing lid
    •  The ability to lock the lid in an open position for extended chores (i.e. cleaning out the fridge)
     Cons:
    • Price
    • Small size of each receptacle (a blue 16-liter aka 4.23 gallons and a black 30-liter aka 7.93 gallons)
    • Inserting the bags properly does take a little more time and getting used to
    • If you want the proper fitting bags, they can be pricey (I am using my regular 13-gallon ones without too much of a problem, fyi)

    A little "trash can" background:

    I have had this Sterilite 11-Gallon Step On Trash Can for over ten years with zero problems.  It washes well, was less than $15.00, the bag sometimes falls inside of the can and it is white (my fave color).  Alas, I was bored with it.


    image via Walmart

    My Trashcan Research:

    From the beginning, I really wanted the simplehuman trash can, but I could not justify the expense.  Almost $200 for a trash can!?  What was I smoking?  (Disclaimer:  I don't smoke anything).  So instead I headed over to Sam's Club and bought their knock off version.


    image via Sam's Club

    I mean, it came with two trash cans, was less than $50.00, had the removable insert,  slow closing lid and lock mechanism I so coveted in the simplehuman version.  I though to myself, Why not?   Winning!!  Not so much.  This can broke within the first month.  The lid stopped functioning properly.  I fixed it once and my husband fixed it a second time.  It jams halfway open or closed every other time you try and throw something away.  It is now at the point where it refuses to close even when you press on the lid.  They look great, they just don't work well.  I have dealt with this since August.  AUGUST!!  The mini one works fine, but they are both outside ready to be taken back to Sam's Club (they have a great return policy by the way).

    Mama needs her $50.00 back.. Just saying.

    I have owned my new trash can less than 24 hours and I am in LOVE.  In love with a garbage can?  Yesssss, yes I am.


    I am super excited with my new purchase.  Even more so because I was able to purchase it for a lot less than the retail price.  Here's how:

    $179.99 Bed, Bath & Beyond Price
    -$36.00 BB&B 20% off coupon
    -$50.00 Gift Card I received for Christmas
    -----------
    $93.99 Price I actually paid (before tax)

    I realize this is still an astronomical amount to pay for a trash can.  Did I really need it?  Most likely not, but I really wanted to de-clutter my kitchen and not have two separate bins for trash and my Dasani water bottles.

    Have you been eyeing one of these, too?  I figure we only live once, so...all you need to do is get yourself a coupon, find a friend willing to give you a gift card and go get yourself one of these bad boys.

    As always, thanks for reading.  :)

    Tuesday, February 12, 2013

    Hall Closet Organization: Part One: Ideas & Inspiration

    The Linen/Hall Closet aka The Hot Mess in our home has been on my "to do" list for...well, forever!  I am almost too embarrassed to even post my before pictures.  If it were up to me, it would never be a mess.  Alas, an eight-year-old, a messy husband and one other person who shall not be named (my MOTHER!) get their hands in there and POOF! it becomes a hot mess.  None of them will admit this, you see, so that means I am left with the task of organizing and reorganizing and...you get the picture, right?!

    Enough is enough!  I need a functional, user-friendly hall closet.  Sooner, rather than later.

    In all fairness, our Linen/Hall Closet has a lot to handle.  Not only does it house linens, towels, etc., but it is also home to medicines, vitamins and first-aid paraphernalia, as well as unopened toiletries such as dental floss, toothpaste, soaps, shower gels, razors, cotton balls, etc.  Now, that is a lot.  Factor in my obsession with Bath & Body Works sales, and there really is not a lot of extra space.  If any.

    My ideas for our space are simple:
    • Streamline the space
    • Tidy it up in order to be super organized and efficient
    • Make things easy to locate
    • Make things easy to put back (this is the biggest problem our family faces)
    • Possibly make room for toilet paper and paper towels (I wish, I wish!)
     
      My dreams for our space:
    • Adjustable Shelves
    • Lined shelves (a pretty, clean pattern and something I won't loathe in a few months)
    • All white linens & towels (this is something I have actually been working on the past 6 months or so)
    • Ironing Board Storage

    I have been searching the web for some inspiration.

    I am for sure not going to go as far as ironing every single sheet and pillow case to make my Linen Closet look this fab:
    image via Martha Stewart
    But, a girl can dream, eh?
     
    I LOVE this:
    image via a blog I found via Pinterest

    This is pretty:
    image via Style at Home

    Ironing Board Storage:
    image via Collect 5

    I adore this "basket" for each room idea:
    image via Collect 5

    One last thing.
    I absolutely love this and aim to at least try it.  I am not sure I will be able to make it look as perfect, but I am going to try my best!
    image via Martha Stewart

    I could seriously do this all day.  Seriously.  Once I get started browsing for ideas on Pinterest or the web, there is no stopping me!

    Do you Pin?  If so, feel free to check out my boards.  I promise they are super organized and full of a ton of home inspiration ideas.

    I need to back away from the computer and get busy on my closet makeover.
    "Part Two" to follow soon...

    As always, thank you so much for reading.  Please leave a comment.  <3

    Wednesday, February 6, 2013

    Sensitive Skin Must Haves: Smooth Legs Edition

    Do you love soft, smooth legs and skin?  Well, I do.  Who doesn't, right?  There are numerous products on the market that promise you the closest, smoothest shave and some may deliver.  Most, however, do not.  Many of my girlfriends prefer to use their husband/boyfriend/guy friends razors.  This mama, does not. 

    When I want to treat myself to a spa-day without the spa price tag, I do these four simple things:

    1.  Scrub
    Before stepping into the shower, I use a body scrub.  I turn on the shower, so it will be nice and steamy and I use this scrub.  I use it everywhere (except on my face, of course).  It smells AMAZING in the shower (think eucalyptus) and leaves absolutely zero scent on my skin.  This, I love.  A little goes a long way.  Once you are done scrubbing all of your dead skin off (ew), rinse thoroughly.  As in, all of your nooks and crannies.  This is a salt scrub, not a sugar scrub. So, be sure to use this PRIOR to shaving.  Not after.  Or you will be in for a painful surprise.

    US $24.00


    2.  Cleanse
    Body washes come in many different formulas.  Don't worry about those.  Try this one.  It is THE. BEST.  It is so awesome, even my 8-year-old son begs to use it!  It smells like cake batter, but ONLY while you are in the shower - it leaves no scent on your skin after rinsing.  How awesome is that?  Maybe some of you like smelling like a bakery, alas I do not.
    I digress .
     
    This product, in combination with step 1, will give you the closest shave ever.  I swear by it.  True Blue Spa offers a product specific to shaving, but the scent kills me and I love this one more.  So, there.  Even if you hate it, you can return it - Bath  Body Works has one of the best return policies around.

     
    3.  Shave
     This is the best razor evaaaaa.  No, seriously. It is.  I have never experienced a closer shave in my life.  Also, it works wonders on my sensitive skin.  No bumps, nicks or cuts.  Used in conjunction with the above shower cream, you will get the most out of this razor.  The only con regarding this product is the price.  The refills are super pricey unless you get them at Costco.  They have the best price I have found so far.  Sometimes, the package even includes the Gillette Shave gel.  Throw that away.  You won't ever need it.  :)  Just kidding, give it to your sister.

    (Fair to say, I have also used this razor with other shower creams/shave creams/gels with a similar effect, however nothing beats my 4-step process.  Just saying.)
     
    Gillette Venus Embrace Razor
    Approx. US $10.00 (includes one razor and two cartridges.  It even comes with an "In-shower razor holder" that suction cups to your shower wall for ease of use.  Can we say, Awesome?!

    (Bargain hunters:  I checked the Gillette website and found this gem:
    A $3.00 off coupon.  Okaaaayy!  Now we are shopping!)


    4.  Moisturize
     Not all body creams are created equal and this one sets the standard to ruin all other body creams for you.  Not only is it fragrance-free, but it also has shea butter in it, so it is ultra-rich.  At first, it may seem a bit greasy - but it is thicker than most creams and you only need a small amount.  I usually squeeze a nickel sized amount onto my palm and then rub it between both of my hands - this will help it spread more easily once  you apply it to your body.  I do this as soon as I get out of the shower, after drying off, but before getting dressed.  Who am I kidding?  I roam my house in the nude all day.  Pffft.

    US $15.00
     
    If you don't experience the softest, smoothest skin after using these four products, tell me what you do use to get a spa-like feeling at home.  I will go and buy it immediately to try.  No joke.  Well, unless it is like a trillion dollars.  Mama can't be affording all of that!

    I understand the price of some of these items may seem a little steep, but trust me.  I always find a deal.  For example, a few times a year Bath & Body Works has a sale on their True Blue Spa line and believe it or not these products can be found for buy 2 get 1 free.  (Uhm, like as in right now.  I just checked).  You just have to pay attention.  Oh, and stock up!  I usually buy about $150 dollars worth every year.

    By the way, if you are asking yourself, "Does this chick work for B&BW?!", the answer is no.  I can't even use most of their products without having a reaction - including the candles, because of my sensitivity issues.  I received the body scrub as a gift years ago and have been hooked on these three products since.
      
    (I also do my own spa mani & pedi at home, too...maybe I will write a post on that later).

    As always, thanks for reading and please share this with your friends and feel free to leave a comment.  :)