
 |
| Backyard Botanical Complete Gardening System |
Please note I am a details type of girl, so this post is super detailed. Maybe next time I should break something this big up into smaller posts? I'm not sure....okay so here goes...all you ever wanted to know about the....wait for it....drum roll, please:
Backyard Botanical Complete Gardening System by Leisure Time
 |
| photo via Sam's Club |
SPECIFICATIONS
(via Sam's Club Website)
MY REASONS (aka justifications)
I have been coveting this garden since 2009 (!!) and could never bring myself to spend the money. It is pricey, but after getting it all together, even my husband agrees it is well made and well worth the cost. Even though we live on a little over 2.5 acres, it is extremely hard to grow anything. We have rabbits, squirrels, gophers, owls and even the occasional coyote. Our dog, Gracie brings us "treats" often. Ew. Those pests demolish everything from flowers to grass to our friend Ray's electrical wiring in his car! Twice. Anyway, I knew I for sure did not want to put a ton of time and effort into planting a garden only to have the animals ruin everything.
That was my Reason #1 for buying this system.
Reason #2: I do not want to deal with weeds. Sorry, but this mama is not interested.
Reason #3: Raised gardening is easier on your knees and your back. Isn't it?
Reason #4: I just liked it, okay?
THE COST
I originally saw it at my local Sam's Club toward the end of Summer in 2009 for a little less than $400.00. Sam's club always brings back their seasonal Summer items each year, right? NOT. My bad for not buying it then. Since that time, I have watched and waited for it every Spring & Summer. Just hoping. I knew they had it online, but heck if I was going to pay shipping on this sucka. When I purchased mine (March 22nd, 2013), this website was selling this same system for quite a bit more than what I paid: $1099. It is now listed for $599.00 (including shipping). Home Depot and Sears both carry it for $799. I bought mine from Sam's Club for $575 (including shipping). Tax was not included, so my total with shipping and tax came to $621. Fair to say, it did take about a week longer than the estimated time of arrival I was given.
THE PREP
Before we could even think of setting something this big up, I knew we had to figure out where we were going to place it. The instructions say, "For best gardening results select a level area that will receive at least 6 hours of sunshine per day." I chose somewhere close to my house, because let's face it, I am not about to be gardening all the way down at the other end of our property. Period. Also, I needed a sunny location and access to water. I was already asking a lot of my husband without adding, "Please run a water line for me, too."
I mentioned where I thought I wanted it and before I could even consider other places, he was already out there prepping the ground! Hmmm, note to self: decide if I really want the driveway re-paved and an electrical gate with call box. I digress.
First, he measured the space we would need for the actual garden (8x8) and then an extra foot in order to leave room for pavers or ground cover. Next, he spray painted lines to use as guides. Then, he fired up our rototiller and got to work. All in all, it took less than an hour to prep the ground from start to finish. It was super soft when he was done. Like so soft, that my Havaianas literally sunk into the ground. Anywho, here are some before, during and after pics:
 |
| Spray painted lines to use as guides. |
 |
| Another view of area to be tilled. |
 |
| I had no idea we actually owned one of these. |
 |
| My husband, Sal, hard at work. |
 |
| First turn. |
 |
| You get the picture, eh? |
 |
| Finished with the hard part. |
 |
| Ground tilled and smoothed with the flat side of a rake. |
 |
| Random bird. Thank goodness Gracie was asleep. |
Once my Backyard Botanical Complete Gardening System finally arrived,
We asked our friend, Lucas to
I would like to mention, Lucas said the biggest problem with the assembly was that the "tools required" section did not list all of the tools required (!!). Thank goodness he is a man of many tools and happened to have all of the extra drill bits and other paraphernalia required to complete the job. Also, be advised: not a single hole was pre-drilled or marked. It was a lot of work. I highly recommend hiring a skilled person to assemble this thing. Had I begun on my own, I would have been upset, to say the least.
 |
| Lucas, reading the directions before starting. |
 |
| Organizing the materials and still reading. A boy who actually reads! |
 |
| Base put together. |
 |
| Adding the plastic liner. |
 |
| My 8-year-old son wanted to help, too. |
 |
| Assembling the back. |
 |
| A drill gun is a must for this project. |
 |
| Dry brushing Thompson's WaterSeal |
 | |
| Lucas, done for the day. |
 |
| Alas, our work continues on until early AM. |
We also installed the included automatic soaker hose irrigation system with timer. Many of the reviews for this system suggested testing the hose prior to installation, but my husband said the hose was a high-end brand and it would be fine. It was. I was way too tired to argue.
 |
| Professional Grade Weed Blocker Cloth |
 | |
| Mulch Complete |
 |
| I am in LOVE. |
 |
| Plant Placement: Decisions, decisions... |
 |
| Plants have been planted. My child is happy. |
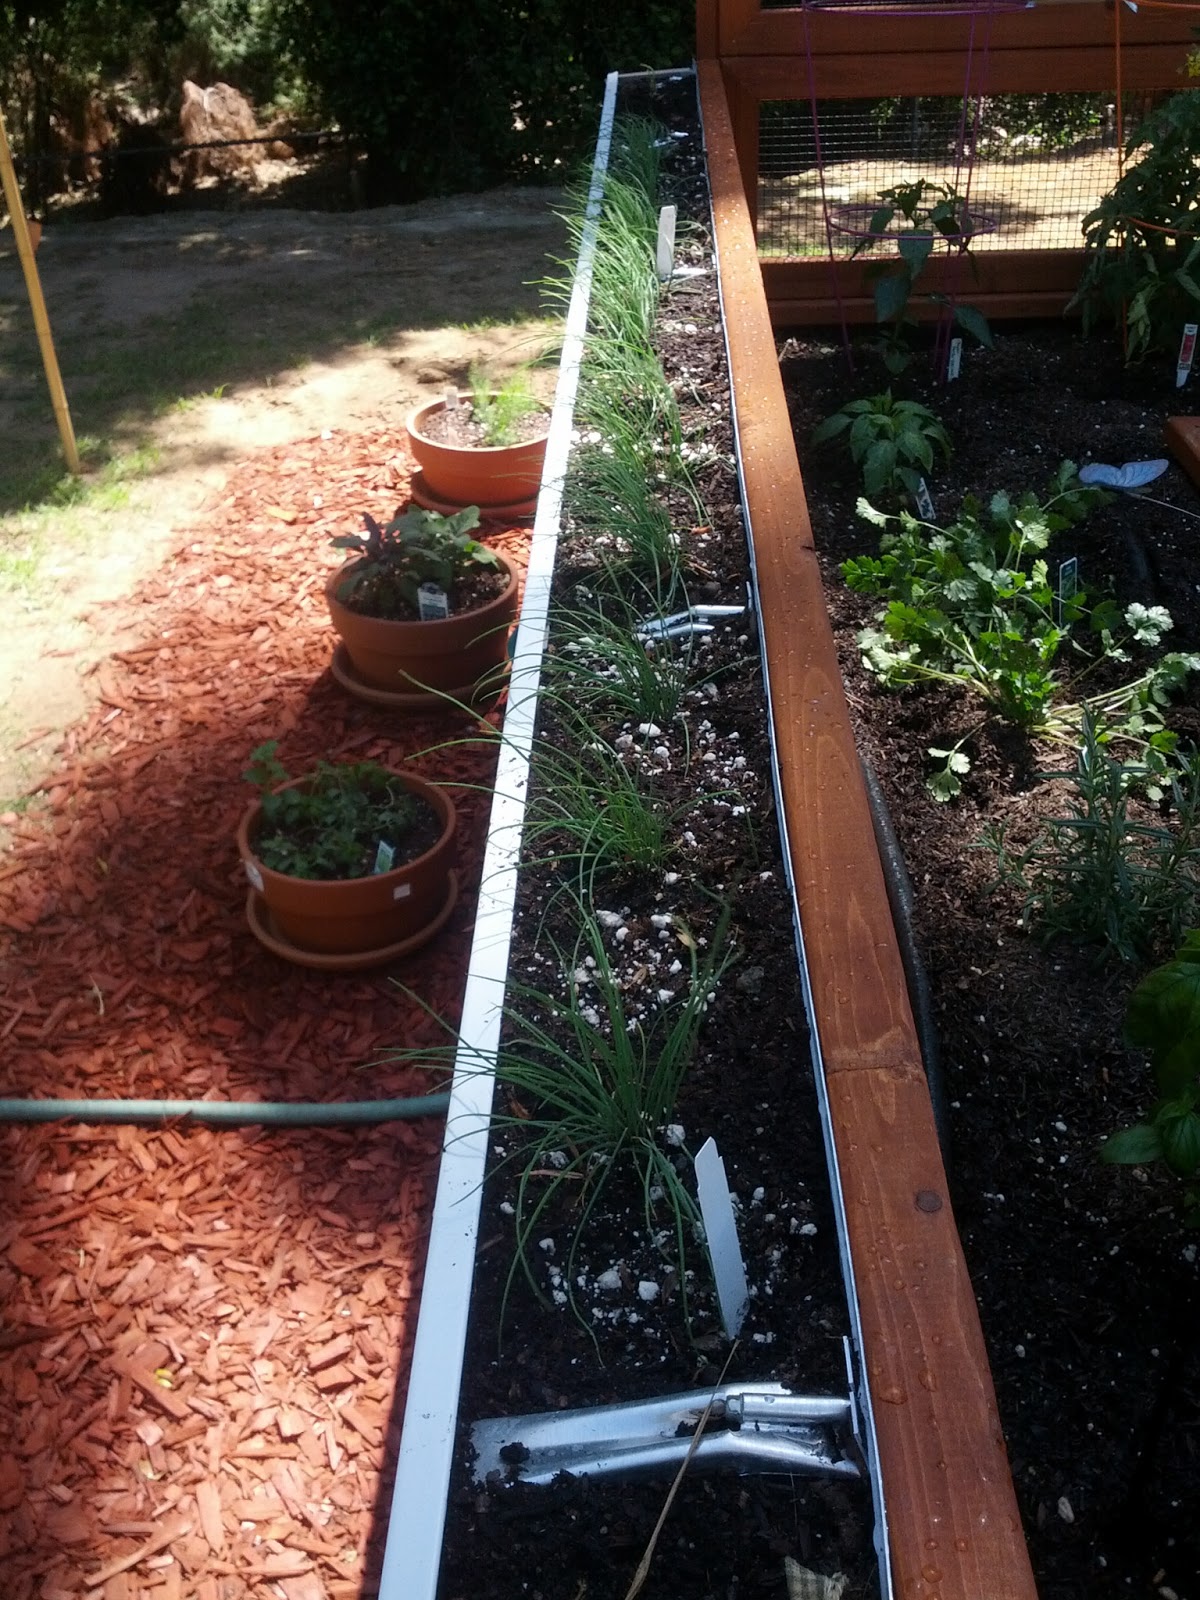
 |
| Seamless Rain Gutters by HASCO filled with Potting Soil |
 |
| Day time shot of the completed garden and gutters. |
Galvanized Mesh Screen: $20
Professional Grade Weed Blocker Cloth: $49
Patio Plus Soil: approx. $150
Mulch for ground cover: approx: $100
Thompson's Water Seal: $16
Sprayer for Water Seal: $10
Rain Gutters: approx. $70
Plants, pots and additional soil: approx. $200
WHAT I PLANTED
Basically, what I wanted in my garden were vegetables that would allow me to make salads, a nice stir fry once in a while, salsa and also some herbs for roasting chicken. Too bad, so sad - lettuce, carrots and broccoli are out of season in my area.
I am currently growing thyme, basil, rosemary, cilantro, chives, a variety of onions, chili peppers, jalapeño, 4 types of tomatoes, celery, green, red, and yellow bell peppers, yellow squash, zucchini, 2 types of cucumbers, asparagus, 2 types of sage, gingermint and strawberries. Oh and some aloe vera plants recovered from my dad's house after the fire. In addition to all of this, I had my husband plant lemon and lime trees near by. We already have about 7 avocado trees as well as different types of oranges.
Eventually, I will plant lettuce, carrots, broccoli, corn, potatoes, watermelon, pumpkin and some other things I am sure I will think of later.
THE PROGRESS
Week one: The pesky rodents have yet to discover my garden. There are no weeds. My back is not sore. It looks absolutely gorgeous. Seriously, almost all of my friends are envious. I'm envious and it's my garden!!
The only problem we have encountered so far is either the original washers included with the kit for the timed watering system or the timer system itself (yet to be determined) needs to be replaced. They leak no matter how much we tighten the fittings. My husband is going to buy some different washers to try and fix the leak. I will report back once we have figured out what the problem is.
 |
| Back View: Cucumbers, beans, squash & zucchini |


 |
| Tomatoes |
 |
| Strawberries |
So, what do you guys think? Have any of you started or plan on starting a garden this year? Please comment below with any tips and tricks you have for gardening in the soon to be Summer weather. This is my first garden, so I am going to need all of the help I can get!
If you loved this post, please give my garden a 5 star rating over at HGTV's Rate My Space. Thanks for reading :)
look great
ReplyDeleteThank you!! :)
DeleteI usually do not create many responses, but i did some searching and wound
ReplyDeleteup here "Backyard Botanical Complete Gardening System Detailed Review".
And I do have a few questions for you if you don't mind. Could it be
simply me or does it look like a few of these responses appear like coming from
brain dead individuals? :-P And, if you are posting at
other online sites, I'd like to follow anything new
you have to post. Would you list of all of your
shared pages like your linkedin profile, Facebook page or twitter feed?
Here is my page :: Garcinia Cambogia HCA
I really appreciate this journal and that i can positive promote this journal to others in my circle.
ReplyDeleteaccess Bee MP3 in UK
Thanks for reading!
DeleteYes, it’s very pretty! It’s good to know that being busy with life didn’t keep you from completing this garden project. I see it’s pricey, but it’s very much worth it, as it means you don’t have to deal with weeds, and raised gardening will give your knees and back a rest. Cheers to that!
ReplyDeleteMitchell Knapp @ Scenic Landscaping
Long story short, have one, instructions lost, can't seem to find any online. Is there any information, phone number, website on any paperwork you might have?
ReplyDeleteMy email is shawnsfurkidz@gmail.com
TYVMIA!
Shawn
Hi Shawn,
DeleteI'm not sure where I put the original directions, but this is one of the companies who used to carry it: http://backyarddiscovery.com/
I will ask my husband if he recalls if we kept them or not and let you know. Good luck!
Hey there~ I have a Backyard Botanical. I got mine in the spring of 2010 - you can read about it here : http://capturedtimebooks.blogspot.com/2010/06/garden-progress.html
ReplyDeleteI am curious. What do you have attached to the side wall (the white item) and what do you have planted there? It seems to fit just perfect!!
Yours looks great! How has it held up? Mine is doing OK. It sunk a bit because so much water drains out, but other than that it is doing well. I'm getting ready to replant some things this weekend.
DeleteAhhh I see it now - rain gutters. Wish I knew someone who made custom gutters! That would be awesome!!
ReplyDeleteThe gutters were custom made through my husbands company. If you have a local gutter company, I bet you could ask them to make you a couple to attach to your garden.
DeleteGreat and that i have a swell proposal: Where To Buy Houses For Renovation home remodeling contractors near me
ReplyDelete